Diversity, Inclusion, and Representation in the Games Industry

The Issue

Header note: this is a refactor of a university-based research task that I believe is important to consider when developing a game. I am by no means an expert on this topic, however, everyone play’s a part in facilitating a safe space for all people to comfortably share their heritage, identity, and agency. In the indie games industry, we have the power to change the stigma and accurately represent the core values of any person. Stand united and strong – be loving and kind. Spread knowledge, squash ignorance, and be a voice for those who want it.

While it is improving slowly, there is a lack of diversity and inclusion in the video games industry (Dealessandri, 2020). This often means that there is an overemphasis on white-male protagonists (Wirtz, 2021), using women as narrative rewards often revolving around sexual objectification (Liu, 2018) and, leaving out an accurate representation of other races.

The video to the right has a very interesting way of describing misrepresentation due to observing other cultures through a fixed lens, stating that collaboration and communication is the only way to accurately represent one another.

A Creative Skillset report shows that BAME (black, Asian and minority ethnic) industry representation stood at 4% in 2015, down from 4.7% the previous year. This is lower than the UK average of 10% and significantly lower than the London average of 40% (2011 Census data). Considering that 37% of the UK industry is located in London, this highlights the level of under-representation for ethnic minority groups.” (Ramanan, 2017).

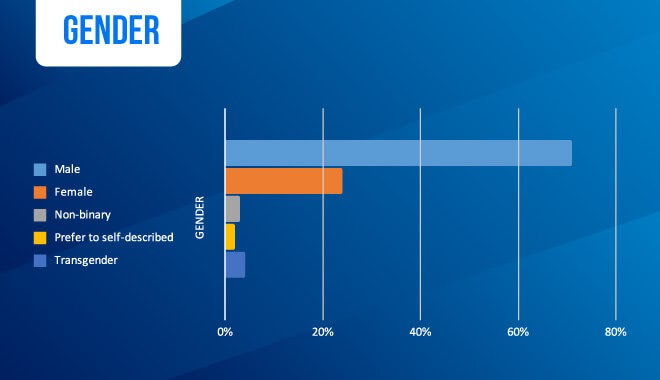
By comparing the data provided in the UK report by The Guardian and the IDGA Statistics (below), we can make an educated assumption that there is a severe lack of diversity in the international games industry. “61% of the population was white, 18% was Hispanic, 13% was black, and 6% was Asian.” (Wirtz, 2021). It is clear that the problem is improving slowly, as the reported 4% diversity in the 2017 Guardian article is now at a rough average of 12% in the 2021 article by Game Designing.


Potential Benefits of More Diversity – Mentally and Financially

This improvement, while encouraging, is still not good enough. There needs to be a heavy emphasis on inclusion to prevent misrepresentation and encourage further inclusion.

As a result of misrepresentation, “The same long-term effects of depression, detachment, disengagement, low self-worth are present as outcomes, as you would see in every day, daily racism”. (University of Saskatchewan, 2018).

So with this in mind, by ensuring diversity in the workforce, games will be able to include more cultures with accurate representations, helping improve the self-esteem of minorities. (Wirtz, 2021).

Not only does the accurate representation of other minority groups help with mental wellbeing, but it can also help the games industry in regards to profit and exposure. By being more inclusive, games will be able to represent global cultures in a way that they can relate to and therefore, increase the potential global exposure (Dealessandri, 2020). More exposure means more profits. Inclusion is not only the ethically correct way to progress but also a financially profitable investment for the business.

If a project targets many cultures, a complicated method of localisation, censorship and, respecting of cultural restrictions for each instance of the project will need to be considered. This is another topic altogether, however, I feel that it is an important factor to at least touch on and consider. An example of this is the Chinese censorship of morality, where players should not have an option to be good or bad. They believe that games should represent “the correct set of morals” otherwise they cannot exist in their media streams (Kerr, 2021). While China is notorious for media restrictions, these kinds of cultural differences can only be understood if proper inclusion and collaboration with the current minority are achieved.


Solutions provided

While I touched on some solutions above, there is a list of different solutions provided by the articles I have read.

  1. Maximise global reach as a result of multicultural inclusion, “So what we need to try and do is maximize the global reach of our games by considering the expectations of a much broader demographic. To better anticipate what those expectations are, we need to have companies that are more diverse and have people from different backgrounds.” | “they were working in a system that was biased and that he wasn’t taking responsibility. So he just decided as the CEO: we’re going to change this. And he made that happen. And really that’s all it takes. It’s a matter of will, making a decision that this is going to be important to us, and we’re going to make this a priority.” (Dealessandri, 2020).
  2. Create Support groups that actively push for change in representation, “Girls Who Code is a group ‘founded with a single mission: to close the gender gap in technology’. They’ve already reached nearly 90,000 girls from every state in the U.S. That’s some serious progress. Reshma, the founder, writes ‘We’ve reached a moment unmatched in our history, a moment as full of anger and anguish as it is promise and potential. Women and girls across the country are coming together to correct centuries-long power imbalances across lines of gender, race, sexuality, and more.’ Girls Who Code offers after-school club programs, summer campus programs, and longer summer immersion programs.” (Wirtz, 2021).
  3. Provide more opportunity for computer science in early education, “Peter Kemp, senior lecturer and head of the research project underlines the importance of early access and uptake of computing. ‘The GCSE will naturally lead into the A-Level and also into degree level because not all places will offer computing at A-Level. So, if you don’t get the GCSE intake right, then you’re going to see a very skewed intake into computing careers because of that.’” (Ramanan, 2017).

When Rivers Were Trails – Case Study

There are instances of games that allow autonomy for indigenous representation already and I could become involved and help push accurate representation. The examples provided seem to be all based in the US (Beer, 2020), however, we can draw inspiration from the examples.

One example of this is When Rivers Were Trails by Elizabeth LaPensée, trailer to the right. In order to accurately represent the community LaPensée was targeting, they ensured that the narrative was written by over 20 indigenous writers, which were all from the tribes located along the trail the narrative is set in (Beer, 2020).

Furthermore, the design process involved in the development cycle included the indigenous community to ensure accurate music and artistic representation. “LaPensée’s goal isn’t just to facilitate Indigenous representation — she also wants to facilitate Indigenous self-determination. This means not just getting Indigenous people involved in games, but giving them meaningful control.” (Beer, 2020). This goes to show that the best way to ensure accurate representation is to have the team descend from the culture you are trying to represent.


What we can do

In regards to what we can do to reduce the minority gap in the games industry in Australia, we can potentially reach out to local Indigenous communities in order to represent them within my projects. While you may not be currently working on projects that represent anyone, in particular, I believe that this would be a fantastic inclusion to strive for. The PDFs below outline how we can get in contact with local communities, how to respectfully communicate with them, and provides resources to help better understand the communities before getting in contact. “Through the unique immersive interactivity it offers, gaming enables Indigenous people to share and reflect on their experiences in a culture that generally distorts or silences them.” (Beer, 2020).


Reference List

Beer, M. (2020). The next chapter of Indigenous representation in video games. Retrieved From https://www.polygon.com/features/2020/2/25/21150973/indigenous-representation-in-video-games

Dealessandri, M. (2020). What’s wrong with the games industry, and how to fix it. Retrieved from https://www.gamesindustry.biz/articles/2020-09-04-whats-wrong-with-the-games-industry-and-how-to-fix-it#section-2

Kerr, C. (2021). Chinese regulators warn devs over depictions of morality, gender, and history. Retrieved From https://www.gamedeveloper.com/business/chinese-regulators-warn-devs-over-depictions-of-morality-gender-and-history

Liu, J. (2018). Gender sexualization in digital games: Exploring female character changes in 0RW1S34RfeSDcfkexd09rT2tomb raider1RW1S34RfeSDcfkexd09rT2 (Order No. 10975189). Available from Publicly Available Content Database. (2167142408). Retrieved from https://saeezproxy.idm.oclc.org/login?url=https://www.proquest.com/dissertations-theses/gender-sexualization-digital-games-exploring/docview/2167142408/se-2

Ramanan C. (2017). The video game industry has a diversity problem – but it can be fixed. Retrieved From https://www.theguardian.com/technology/2017/mar/15/video-game-industry-diversity-problem-women-non-white-people

University of Saskatchewan. (2018). Negative Effect from Lack of Diversity in Video Games. Retrieved From https://www.cs.usask.ca/news/2018/negative-effect-from-lack-of-diversity-in-video-games.php

Wirtz, B. (2021). The Issue of Diversity in Gaming & Changes the Game Industry Is Making To Address It. Retrieved From https://www.gamedesigning.org/gaming/diversity/

Modular Code Architecture

Why should I consider Modular Code?

After working on Stellar Winds (a university final project) for over 6 months, I have managed to build an intense amount of technical debt as a result of my own negligence, in the form of spaghetti code. If you’re reading this then maybe you can avoid the same mistakes that I have made by considering modular code.

Unity offers a very easy way to remove instance reference dependencies and facilitates a space for modular architecture to shine. In this blog, we will explore what Modular Code Architecture is within the context of Unity, how to design your systems in a scalable and reusable way, and define some limitations of the architecture.

If you want access to the source code, check out my Patreon where you can get it for just $1. It takes a lot of time to research and put these together so I’d appreciate the support, thanks!  


What is Modular Code?

Put simply, it is code that does one very specific thing really well. It is code that can be used by anything in any given context. Think of your classes as a specialisation, we wouldn’t want a plumber to install our roof as much as we wouldn’t want a level designer to program our AI.

Don’t worry, we’ll be going over some practical examples that you can pull from and use. By the end of this blog, you’ll have a great understanding of the concept and be able to do it yourself.

“Modular code architecture (enables) code to be split into many independent packages that are easily developed”

(Tayar, 2021).

First things first, make a plan

I get that you want to jump straight in and get it done. Programming and game dev is really fun, but that’s what I did with Stellar Winds and as a result, its codebase is brittle. If you jump straight in without a plan you’ll end up building insane technical debt and waste a lot of time on “unforeseen circumstances.” Just look at this health class that handles shields and health, ridiculous.

Depending on how you currently work or were previously taught, you may have been required to write a Technical Specifications Document. It’s pretty commonly disliked amongst my peers, including myself, however, in the context of modular code, it is the most important step.

Tech Spec 1

Let’s explore my process using an abstracted health system as an example. First, write out everything the SYSTEM should do. Refer to Tech Spec 1.

Next, critically analyse this system, what individual elements can you identify within it and what is its core function? Simply, its core function is to track the progress to the ‘fail’ state. It also needs audio, particle, camera shake, UI updates, and game event triggers.

One thing you may notice is that each element can be separated into two categories. Function and Feedback. With this outlook, we can then define every CLASS that we will need to create in order to develop this system. Remember while planning these out to specify a specialty for each class. Refer to Tech Spec 2.

Tech Spec 2

Finally, if you are more of a visual person like me – you can put together a  flow chart of sorts that clearly defines connections and each class’s specialty. I use Figma for this but a great alternative is draw.io– which can be connected to google drive.


Unity Events

We will be primarily using UnityEvents in order to make everything work and reduce the overall code we have to write, so let’s explore what we can do with them for clarity’s sake. For starters, we can call public methods from a class within the inspector. We can also parse strings and send floats if a method has a parameter. Note that only methods with a single parameter can be used like this.

We can also send dynamic variables by declaring the events a little differently. This is important to understand as we will be using it frequently. You write them as follows:

// Declaration
UnityEvent<float, int, bool> eventToCall;

// Invoking
eventToCall.Invoke(0.2f, 1, true);

Now when we hook up a class that has a method with one of the same parameters, a ‘dynamic’ option will appear in the response of the UnityEvent. Neat right? Note, you can still call normal methods when you’ve marked an event as dynamic, however, you still need to give the invoke method a value when invoking the event. That pretty much sums up UnityEvents, if there’s anything I may have missed let me know.


Execute your bad habits

Now that we have a plan written out and understand how UnityEvents work, we can very easily program all of our classes. Let’s begin with the Health Controller class, we’re simply going to have a float to represent health and three events.

public class Health : MonoBehaviour
    {
        [Header("Values")]
        [Range(0, 1)] public float health;

        [Header("Responses")]
        public UnityEvent<float> onDamaged;
        public UnityEvent<float> onHealed;
        public UnityEvent onDied;
    }
public void ProcessDamage(float dmg)
        {
            health -= dmg;
            if (health <= 0)
                OnDied();

            OnDamaged();
        }
        public void ProcessHeal(float dmg)
        {
            health += dmg; OnHealed();
        }

        private void OnDamaged() { onDamaged.Invoke(health); }
        private void OnHealed() { onHealed.Invoke(health); }
        private void OnDied() { onDied.Invoke(); }

Now add ProcessDamage() and ProcessHeal() methods that accept a float parameter. Then, add three methods that invoke each relative UnityEvent, so it’s very clear what we’re doing. For now, I suggest either hooking up two simple inputs or using EasyButtons so that we can test it in isolation.

Now that we have our health class set up, it’s time to move on to the individual classes: Audio Controller, Animation Controller, Slider Controller, Camera Shake Controller, and Game Event Controller. These are all really straightforward, with the exception of the animation controller – so I won’t go into detail for each class. Instead, this is a perfect opportunity for you to do it yourself – using your technical specifications as your guide. Try to ensure that a single public method can be called to invoke the desired feedback.

Let’s look into the Animation Controller. As you may know, the Animator uses parameters for its state machine to function. With this in mind, you can create simple methods that take a string as a parameter to control the animator. We can invoke a Trigger, Set a bool, and Set a float value for blend trees.

Animator.SetTrigger(paramater)
Animator.SetBool(paramater, condition)
Animator.SetFloat(paramater, float)
public void SetAnimationTrigger(string animationTrigger)
        {
            animator.SetTrigger(GetParamName(animationTrigger));
        }
        public void SwitchAnimationBool(string animationTrigger)
        {
            string param = GetParamName(animationTrigger);
            animator.SetBool(param, !animator.GetBool(param));
        }

        public void SetBlendTarget(string blendParam)
        {
            targetBlendParam = blendParam;
        }
        public void SetBlendValue(float value)
        {
            animator.SetFloat(targetBlendParam, value);
        }

There could be any number of ways to do this, however, how I did it was to create a list of strings that act as an identifier for each of the parameters in the Animator. I then have four methods to interface with the Animator and a handler for checking the parameter name.

Pretty easy right? I just took inventory of what the animator can do and put together methods that facilitate UnityEvent interaction.

Now of course you could declare a UnityEvent that takes in both a string and float to skip the need to store a reference to the blend parameter – if that’s how you want to do it. However, I wanted to ensure that I didn’t have anything other than health variables in the health class. Again, it all depends on your system and the plan that you created.

If blend trees are a core function of your system then maybe this would be the way to go, however, I don’t mind the extra step of storing a reference to the target parameter. 

With the hardest class explained, you’ll be able to easily put together every other controller class without instruction. Give it a go before moving on.

// Decleration
string blendTreeParam = "objectScale";
float health;

UnityEvent<string, float> onChangeBlendEvent

// invoking
public void ProcessDamage (float amount)
{
health -= amount;
onChangeBlendEvent.Invoke(blendTreeParam, health);
}

Putting it together

Right so now that we have all of our classes, let’s set up our player object. I have a very specific way I like to name and structure my objects (which I’ll make another post on in the future), so I’ll quickly put it together and show you where I have put each class.

Now, by referring to the first instance of our tech spec, we can clearly see what methods we need to call through our UnityEvents. So let’s quickly do that. Note: objects highlighted in red are objects that the UnityEvents reference.

On Damaged

  • Slider Controller – UpdateSliderValue (dynamic float)
  • Animation Controller – SetAnimationTrigger(Damage Anim param)
  • Animation Controller – SetBlendTarget(Blend param)
  • Animation Controller – SetBlendValue (dynamic float)
  • Audio Controller – Play
  • Particle System – Play
  • Camera Shake – LightShake

On Healed

  • Slider Controller – UpdateSliderValue (dynamic float)
  • Audio Controller – Play
  • Animation Controller – SetBlendTarget(Blend param)
  • Animation Controller – SetBlendValue (dynamic float)

On Died

  • Game Event Controller – Trigger

Notice how quick that was? Now if we don’t have an audio source for some reason, don’t worry, the core of your system will still work. This is because we separated everything into modular parts that don’t need a lot of messy instance references. You can also save this as a prefab calling it “Object With Health,” or something like that, knowing full well that everything will work straight out of the box. You can then adapt it to an enemy, follower, destructible box – literally anything that has health. The power shines here with the destructible box example. We don’t want UI to show health on a box so we just remove the UI controller, everything still works, and you didn’t have to refactor your hardcoded system to remove UI, great!


Increasing Scope

So now we’ve managed to create a nicely organised modular system, in definite contrast to the spaghetti code you may have been writing up until now. It’s refreshing, isn’t it? However, overall, this class is much simpler than the health class in Stellar Winds (about 250 lines simpler). One thing to consider here is Stellar Winds features shields and this example system does not. “Is that why it’s 250 lines shorter?” aha, no… The next step is to scale the systems up further, so let’s start by adding shields. 

Now you could just add another float, a set of UnityEvents, and their relative methods to the Health class and call it a day. However, that’s not very modular, is it? What if we wanted to add an ability that gave the player another temporary layer of protection in the form of an over shield? That means we need to add, again, another float, a set of unity events, and their relative methods. Just as this paragraph is getting longer, so will your code.

Tech Spec 3

“Okay I get it, what do we do then?” I hear you ask. Well this is where I remind you that it’s important to plan this stuff out in the technical specifications (as I have done – refer to Tech Spec 3), but I won’t get you to do that, instead just follow these really simple steps.

First, refactor our current health controller class into a normal C# Serializable class called Stat. Change the float, all relative events, and methods from “health” to “stat.” We’ll also want to change “OnDied” to “OnStatZero” and “ProcessDamage/ ProcessHealth” to “DecreaseStat/ IncreaseStat” for clarity. 

Let’s also add logic for recharging the stat over time with a bool (or enum if you like) controlling whether it can recharge or not. Finally, put the logic into a Tick() method that we can call from another update method.

Next, let’s make a new Health Controller class that has two “Stat” variables. These will replace our health float and acts as our new shield float. Just as before we’ll need to add ProcessDamage() and ProcessHeal() methods. Let’s also add an onDamaged and onDied UnityEvents so we have a higher level of control and remember to call each stats Tick() method in the Update() method. 

Okay great, so now we’re pretty much back to where we were except this time we have two stats to work with. The best thing is, we can add as many as it makes sense. Setting this system up is exactly the same as the previous, however, now we have control over individual stat changes nested within the new Health class.

Now you may also be thinking, “But what if as you said, we want to add a temporary overshield? Would we have to declare a new stat for each temporary item we want to add? If so, would that not just be spaghetti code creeping back into our development patterns?” You can probably guess what I’ll say at this point. Did you plan ahead and allow for temporary stats? If the answer is yes then you probably didn’t ask that question.

Luckily, because of this modular architecture, it is really easy to add a list of stats for temporary buffs. These could dynamically change through play or you could replace your health and shield stats with a list of stats and use ints to identify each one. 

Now I couldn’t possibly answer every question you may have in a blog written before you read it, but hopefully, you can adopt a modular mindset and put together a system that fits your needs.


Advanced Simulated Health System

Now, as part of increasing the scale of our modular system, let’s explore a simulated health system. I will be using Fallout’s limb damage as an example here and focus purely on the legs.

I will again remind you that this is something that needs to be planned in advance, however, due to the holistic approach of this blog, we can explore how to do this without a solid plan.

Here’s a quick and dirty movement class that I wouldn’t recommend using in an actual project, but will work well for this example.

public class MovementExample : MonoBehaviour
    {
        public Vector2 speed = new Vector2(0.5f, 5f);
        float currentSpeed;

        private void Start()
        {
            SetSpeed(1);
        }

        private void Update()
        {
            Vector3 input = new Vector3(Input.GetAxis("Horizontal"), 0, Input.GetAxis("Vertical"));
            transform.Translate(input * currentSpeed * Time.deltaTime);
        }

        public void SetSpeed(float percent)
        {
            currentSpeed = Mathf.Lerp(speed.x, speed.y, percent);
        }
    }

Now let’s create a new health class similar to the other, allowing for individual limb damage. Create a Unity Event called onLimbsDamaged where we use a float as a parameter. This is going to send the per cent of total leg health to our movement class. This looks like:

Float percent = (leftLeg.value + rightLeg.value) / 2

Next, let’s hook up the movement class’s ChangeSpeed() method to the onLimbsDamaged responses in the inspector. Let’s also set up some UI to represent limb damage.

Easy, now when each limb takes damage, the overall speed of the player is reduced linearly. You can make this as complex or as simple as you want, but notice how straightforward it is to create more advanced systems with this modular method.

You can easily isolate function and all feedback works as intended while you make changes to your existing systems. No more spaghetti code and no more wasted time.

I said I was going to discuss some of the limitations of this system and I will, however, this should be enough for you to go ahead and start planning out and executing your own systems. If you want to go ahead and do your thing then go for it, but there are some limitations to be aware of. 

Before I get into that though, if you want access to the source code, check out my Patreon where you can get it for just $1. It takes a lot of time to produce videos and write out blogs so if you can support me then I’ll be able to make more resources for you to use and I would be forever grateful. Thanks for your time, it means a lot.


Limitations, Considerations, and Possible Solutions

Limitation 1: As designers gain more control over game logic, programmers lose control. By moving all logic into Unity Events, you effectively make instance references useless in some cases.

Potential Solution: Clearly define what systems REQUIRE programming to be the main form of control while allowing designers to interface with it in a similar and easy fashion.

Limitation 2: If you are experiencing a logic error, it could potentially take more time to dig through your nested prefabs to find where the error is located.

Potential Solution: Take advantage of the modularity and test everything in isolation before marking the asset as ready. Create prefabs that have preset feedback and create variations to preserve the original working copy.

Limitation 3: You cannot interface with static classes or manager classes that are instantiated at run-time as you would with feedback classes. This is due to the fact that you need an instance reference.

Potential Solution: Use a Game Event system similar to or exactly the same as defined in this video. I have created a controller class for this in the package on Patreon or you could make your own.

There may be more that I haven’t come across yet, but if you keep these in mind, I am positive that you’ll have a great system that is easy to debug, expand, and entertain. Thanks again!